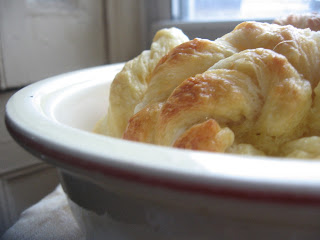
Most sequels are inferior to their pioneering counterparts, falling victim to predictability and witless exchanges. However, in cooking, second or third time is often the charm, especially when working from a different recipe with new and enhanced tools.
As I mentioned in my last danish post, lemon danishes have just about disappeared from the face of the earth (or at least the three bakeries in Queens and the dining hall at my school that I've explored). Suffice it to say, they are now an endangered species and so I took it upon myself to repopulate my little corner of the world.
My last danish attempt was pretty good for a first try, but resembled more of a hybrid between an english muffin and a buttermilk biscuit. This time, I was determined to make a proper danish and armed with my new marble rolling pin and pastry cloth, I set about the task with as much determination as I could muster.
I stumbled upon a wonderful blog called Joe Pastry, dedicated to introducing proper pastry techniques to baking enthusiasts. I followed his sometimes tedious step by step instructions, that seemed to go on for pages. I learned about the lamination rule, which explains the mathematics behind layering pastry dough (dough folded into threes like a letter in an envelope must be rolled out and then refolded; each refolding raises the base three to the power of five such that if I roll my envelope dough five times, I get 3^5 layers in my cooked pastry).
I also learned about proofing, which creates some sort of greenhouse for the yeast and allows the uncooked, but shaped and ready to bake dough, to rise considerably. But, let's not get ahead of ourselves. I began by using my dough hook for the first time when I added 2/3 cup of whole milk, 2 tbs sugar, 1 1/2 tsp yeast, 2 cups flour, 1 egg and 1/2 tsp salt to a mixing bowl.
Mix with a dough hook (or a wooden spoon) until thoroughly incorporated. I then let the dough rest at room temperature for half an hour and then in the refrigerator for 2 hours. As your 2 hour mark draws closer, you can begin to 'make' the butter slab. Use 1 cup of European butter (higher fat content makes for flakier pastry) and put it on cellophane.
Add 2 tbs flour to the top of the butter (spread) and then cover it with cellophane. You should have a plastic wrap butter sandwich. Then take your rolling pin and don't roll but pound your butter at right angles, until it's pretty flat. If it gets too greasy you can put it in the fridge for a while. When your butter is smooth and flat, fold it back to look like a block.
You can then take your dough out of the fridge and I put mine on my floured pastry cloth. Roll the dough out until it's slightly square and put the block of butter on it. Now fold the sides of the dough to enclose the butter and squish the tips so that the butter is really encased (no openings).
I then used my rolling pin to press hard on the dough/butter envelope at right angles to push the butter to the edges. Joe pastry recommends cutting a bit of a tip or side of with a pastry blade to make sure the butter is being pushed to the sides. After pushing the butter to all the sides, I rolled the dough out until you have a long rectangle. Fold this up in threes like you would a letter for an envelope, repeat and then put it in the fridge for 15-20 minutes.
Then take the dough out, roll it, and repeat 3 times with 20 minute intervals at room temperature. When the dough is all done, it should sit in the fridge for an hour. During this time, you should make some almond buttercream (1/2 cup of butter with as much confectioner's sugar as you'd like plus almond extract for flavor).
When the dough comes out of the fridge, roll it one last time and spread the buttercream around the dough. You can then fold the dough in half and roll it gently. For the shape of danish that I made, I cut long strips from the rectangular dough and then elongated the strips by holding them on their ends and lightly flipping them backwards and forwards.
Careful not to break the strips in this process, although they can of course be reconstituted should something go awry. Then twist the strip and roll into a pastry shape, making sure the end is securely pressed onto the body of the danish.
I put the danishes (which don't expand much) on cookie tins lined with parchment paper and proofed them for 2.5 hours, spritzing them with water every 45 minutes. Make sure to re-cover the danishes with cellophane after every spritz.
I then made an egg wash from an egg yolk plus a tbs water and brushed the danishes with it. In the oven they went for 15 minutes at 375 F. You know they're done when they are golden on top. I made my lemon curd separately and you can find my recipe for that in the original lemon danish post.
You can spoon the curd on when you're ready to eat, because the danishes taste much better at room temperature. I also added a light glaze (just drizzled on the pastry) consisting of confectioner's sugar, water, almond and lemon extract. Stir together until you have a whitish paste. I have to say, my danishes were flaky, layered and light...and of course lemony. At least I know now that I have the ability to save the dying breed of danish, but of course only when I have hours and hours at my leisure.


No comments:
Post a Comment